How to Test Treadmill Motor Amp Draw: Step-by-Step Clamp-Meter Guide to Measure Current and Diagnose Motor Issues
Introduction
Understanding the amperage drawn by a treadmill motor is essential for diagnosing performance problems, preventing overheating, and extending equipment life. This guide will teach the reader how to safely measure motor current with a clamp meter, interpret the data, and identify common faults. By following the procedures, one can determine whether the motor is operating within manufacturer specifications or requires maintenance. The information is valuable for home owners, fitness center technicians, and DIY enthusiasts who want reliable, data‑driven results.
What You'll Need
- Clamp meter (recommended: Klein Tools CL120VP Test Kit, AstroAI Digital Clamp Meter, or FNIRSI DMC-100 Clamp Meter)
- Insulated screwdriver set
- Multimeter with test leads (included in the Klein Tools kit)
- Safety gloves and eye protection
- Notebook or digital device for recording measurements
Step 1: Ensure Safety First
Before any measurement, disconnect the treadmill from the wall outlet and verify that the power switch is in the OFF position. Wear insulated gloves and safety glasses to protect against accidental short circuits or flying debris. Use a non‑contact voltage detector (included in the Klein Tools kit) to confirm that no voltage is present on the motor terminals. This precaution eliminates the risk of electric shock and protects the clamp meter from voltage spikes.
Step 2: Prepare the Treadmill for Testing
Remove the motor cover according to the manufacturer’s service manual; typically this involves unscrewing four to six bolts. Keep the screws in a small container to avoid loss. Once the cover is removed, locate the motor’s power leads, which are usually bundled in a protective sheath. Clean any dust or debris with a dry cloth to ensure accurate clamp placement.
Step 3: Identify the Current‑Carrying Conductor
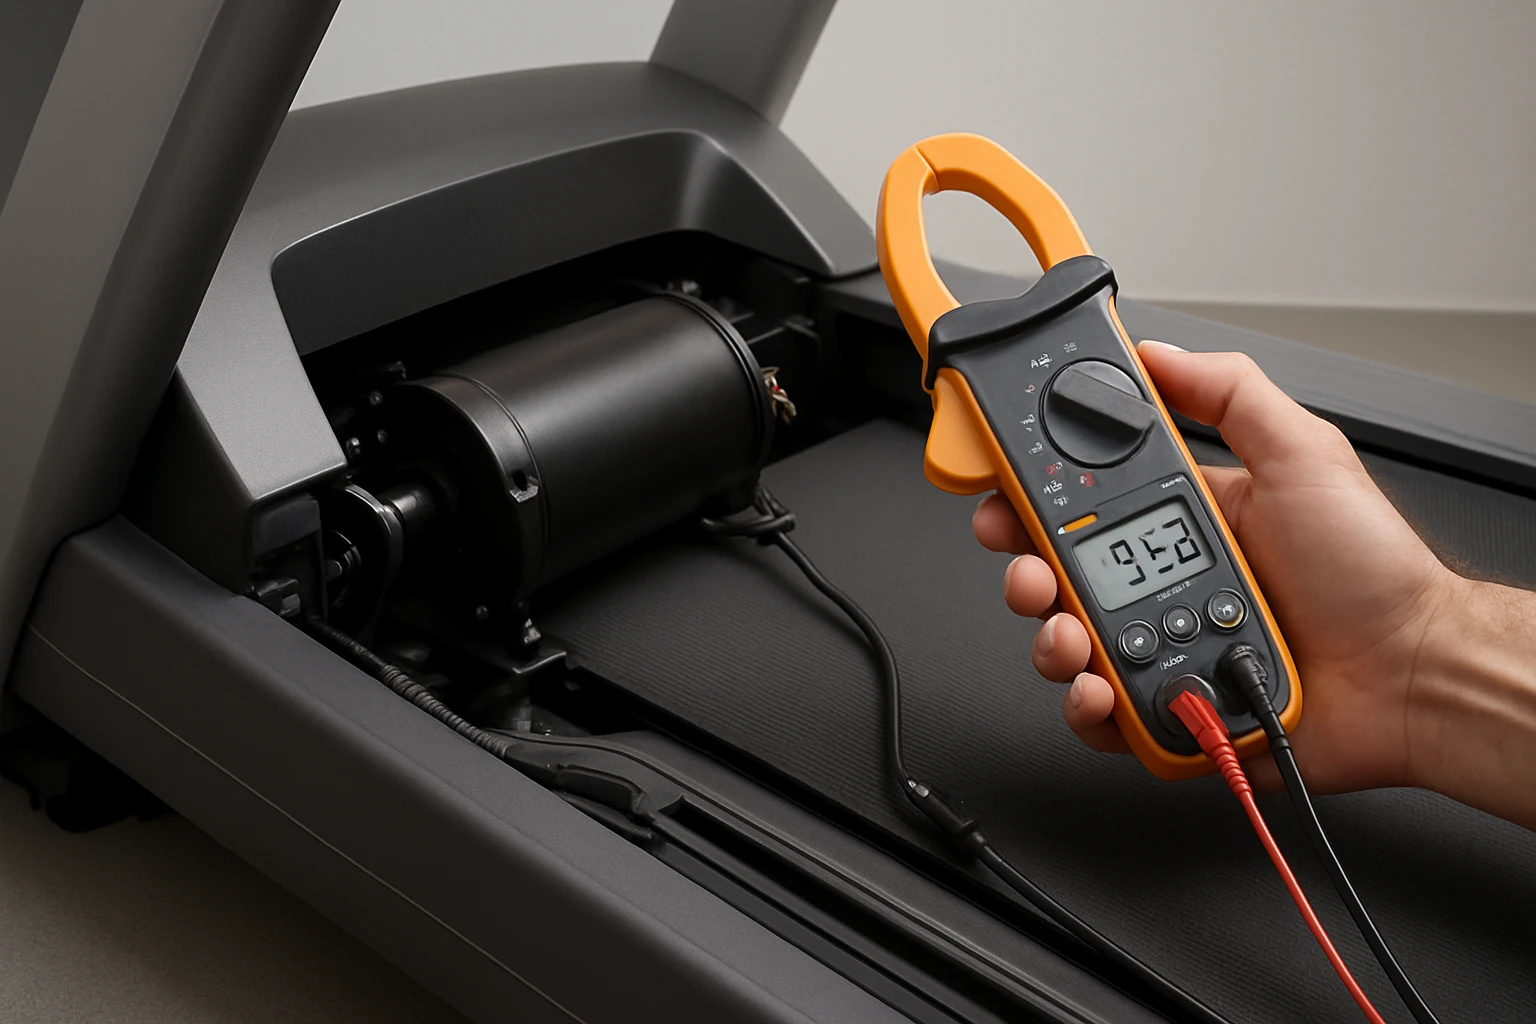
The treadmill motor receives power through a single‑phase AC supply, often a black or red wire within the sheath. It is important to isolate a single conductor rather than clamping the entire cable bundle, as this would produce a misleading reading. Use the insulated screwdriver to gently separate the target wire from the others, taking care not to damage insulation. Mark the selected wire with a small piece of tape for easy identification during measurement.
Step 4: Set Up Your Clamp Meter
Choose a clamp meter that matches the expected current range; most treadmill motors draw between 5 A and 30 A under load. The Klein Tools CL120VP Test Kit offers a 400 A AC/DC clamp range, auto‑ranging technology, and built‑in test leads for voltage verification. Priced at $89.98 with a 4.8‑star rating from 3,884 reviews, it provides professional‑grade accuracy and a convenient padded pouch for transport. For budget‑conscious users, the AstroAI Digital Clamp Meter supplies essential AC current measurement for $21.99 and a 4.6‑star rating, though it does not support DC current. Advanced users who need data logging may prefer the FNIRSI DMC-100 Clamp Meter, which includes a 9999‑count display, curve‑recording, and rechargeable battery for $47.99.
Turn on the selected clamp meter and set it to the AC current mode. If the device offers auto‑range, enable it; otherwise, select a range slightly higher than the expected motor draw (e.g., 40 A). Verify that the jaws are fully closed and that the meter reads zero with no conductor inside – this ensures proper calibration.
Step 5: Measure the Motor Amp Draw
With the treadmill still unplugged, reconnect the power cord to the outlet but keep the motor switch OFF. Plug the treadmill in and switch the machine to the lowest speed setting; this reduces mechanical load while still allowing the motor to run. Open the clamp jaws and place them around the marked single conductor, ensuring the wire is centered for accurate magnetic flux detection. Activate the treadmill, allowing the motor to reach a steady state, then read the amperage on the clamp meter display.
Record the value in your notebook, noting the speed setting, ambient temperature, and any audible noises from the motor. For a more thorough analysis, repeat the measurement at higher speeds (e.g., 5 km/h, 10 km/h) to observe how current scales with load. The Klein Tools kit includes a separate voltage tester (ET40) that can be used simultaneously to confirm that the supply voltage remains within the treadmill’s specified range (typically 110‑120 V AC).
Step 6: Interpret the Results
Compare the measured amp draw against the manufacturer’s specifications, which are usually listed in the service manual or on the motor’s nameplate. A motor that draws significantly more current than recommended may indicate worn bearings, a failing capacitor, or a shorted winding. Conversely, a lower than expected current could suggest a loose belt, insufficient load, or a malfunctioning control board.
Use the data‑logging capability of the FNIRSI DMC-100, if available, to plot current versus speed; a linear relationship is typical for healthy motors. Sudden spikes or irregular patterns often point to intermittent faults that require closer inspection. Document any anomalies and plan corrective actions accordingly.
Step 7: Record, Compare, and Take Action
After completing measurements at multiple speeds, compile the data into a simple table. Highlight any readings that fall outside the acceptable tolerance (usually ±10 % of the rated current). If the treadmill is under warranty, contact the manufacturer with the documented evidence; many service centers request precise amp readings before authorizing repairs.
When the data indicates a problem, use the appropriate tools from the Klein Tools kit to further diagnose: the RT210 receptacle tester can verify that the outlet supplies correct voltage and grounding, while the NCVT‑3P non‑contact detector can quickly confirm the presence of stray voltage on nearby wires.
Tips & Pro Tips
- Always clamp around a single conductor; clamping a multi‑wire cable will produce a false zero reading due to magnetic field cancellation.
- Allow the motor to warm up for at least five minutes before taking measurements; temperature affects resistance and current draw.
- If the clamp meter offers a magnetic hanger (compatible with the Klein Tools CL120), attach it to a metal surface for hands‑free operation while the treadmill runs.
- Use the data‑hold function on any of the recommended meters to freeze the reading for easy transcription.
- When working in a noisy gym environment, enable the audible alarm on the AstroAI meter to alert you to voltage presence without constantly watching the display.
Troubleshooting
Problem: Clamp meter reads zero even though the motor is running.
Solution: Verify that you are clamping only one conductor; if you accidentally include both live and neutral wires, the magnetic fields cancel. Re‑position the jaws around a single wire and ensure the conductor is centered.
Problem: Readings fluctuate wildly.
Solution: Check that the jaws are fully closed and that the meter’s battery is sufficiently charged. Use the auto‑range mode to let the meter select a stable measurement window.
Problem: Measured current exceeds specifications by a large margin.
Solution: Inspect the motor belt for wear, verify that the treadmill deck is not obstructed, and examine the motor windings for signs of overheating or insulation damage.
Conclusion
Measuring treadmill motor amp draw with a clamp meter provides a clear, quantitative method for diagnosing electrical and mechanical issues. By following the safety precautions, using the appropriate tools, and interpreting the data against manufacturer specifications, one can make informed decisions about repair or replacement. Whether you select the professional‑grade Klein Tools CL120VP, the economical AstroAI Digital Clamp Meter, or the feature‑rich FNIRSI DMC‑100, each device offers the accuracy needed for reliable diagnostics. Regular testing can prevent costly downtime and keep the treadmill operating smoothly for years to come.
Products Mentioned in This Guide
Frequently Asked Questions
Why should I measure the treadmill motor's amp draw?
Measuring amp draw reveals if the motor is operating within spec, helping diagnose performance issues, overheating, or impending failure.
What type of clamp meter is recommended for testing treadmill motors?
A digital clamp meter such as the Klein Tools CL120VP, AstroAI, or FNIRSI DMC-100 provides accurate, non‑invasive current readings.
How do I safely use a clamp meter on a treadmill motor?
Turn off and unplug the treadmill, open the motor housing, clamp the meter around the motor’s power lead, then restore power to read the current.
What amp reading indicates a problem with the treadmill motor?
Readings significantly above the manufacturer’s rated amperage (usually 10‑20% higher) suggest motor wear, bearing issues, or electrical faults.
Can I test treadmill motor amperage without disassembling the machine?
Yes, by clamping around the main power cable at the motor’s terminal block, you can measure current without fully dismantling the treadmill.